
Stocks are the foundation of any good kitchen, it is where your dishes are built from. If you don't have a solid grasp of good stock, than everything you make in the kitchen will suffer and snowball from there. Stocks at their most basic can be broken down into two categories, white stock and brown stock. The difference between the two is a white stock is cleaner and lighter in flavour, a brown stock is richer and heavier, as you are caramelizing sugars, and concentrating flavours. In this blog we will show you how to make a white chicken stock, probably the most common stock used in kitchens, as it is extremely versatile in its usage. Stocks are broken down into these 3 major categories; bones/shells, vegetables, aromatics.
Bones/Shells;
Bones; Beef, veal, chicken, turkey, duck, pork, lamb, fish, game birds, none (vegetable stock)
Shells; Lobster, prawns, crab.
Vegetables; Onion, carrot, celery, garlic, mushroom, shallots, celeriac, leeks, tomato.
Aromatics; Parsley, thyme, bay leaves, black peppercorn.
Highlighted above are the ingredients used in this post to make a white chicken stock.
Before I get into the steps of how to make a stock, there are 4 very important things to note when making stock that you must never do;
- The water you start with in the pot must always be cold.
- Cook a stock at a simmer and never let it boil.
- Do not cover a stock with a lid at any point.
- Dont ever stir a stock.
Step 1 - Choose your bones/shells

First thing is determine what type of stock you are making, in this case it is chicken stock, so we will wash our bones under cold water before placing into the stock pot. You can use frozen bones as well, always keep your left over carcasses and shells, and fresh them for this very occasion.
Step 2 - Choose your vegetables

In a white stock we will use a simple mirepoix (onions, carrots, celery) at a ratio of (2-1-1). You may also use a combination of leeks and onions, although leeks are predominately used in beef/veal stocks, or brown stocks. It is always a good idea to keep any unused parts of these vegetables in the fridge in a Tupperware, instead of throwing them in the garbage, as carrot and celery tops, and onion ends, always come in handy when making a stock.
Step 3 - Choose your aromatics

Your aromatics for stock 99% of the time are exactly the same; Parsely, thyme, bay leaves, peppercorn. The only time this would change as if you knew you were going to be making an ethnic stock, and in that case; you may be changing out the parsley with cilantro, the thyme for fresh ginger, the bay leaves with kaffir lime leaves or lemongrass, and the peppercorn with Szechaun peppercorn or red chili flake. I almost always like to start with my base stock, and than add the extra ingredients required for the direction of ethnicity later, this is called making a short stock, and I will be posting a blog later on about this very thing. You can place everything into a cheese cloth and tie it up with butchers time, but I don't see why that is necessary, other than it will be a little easier to skim the stock.
Step 4 - Cut your vegetables into uniform pieces

It is important that your vegetables are uniform in size, usually around 1" squared is good. This is more important in a brown stock when you are worried about even caramelization, but it is still nice to stay consistent.
Step 5 - Place everything into a pot and top up with cold water

Now you are going to want to place everything into a large stock pot.

Top up with cold water, fill the water to make sure everything is completely cover, usually by a couple of inches, this way you will not have to add more water to your pot later on in the simmering process. If you do find that the water level is dipping below the bones, add in enough water to cover, as flavour and gelatin cannot be extracted without the presence of water. It is extremely important that you start your stock with cold water, as it allows the impurities in the bones to be drawn out, slowly, and rise to the top of the pot, where they can then be skimmed out of the stock. If you fail to use cold water, the impurities will coagulate quicker, and not be able to be drawn to the surface, also will make your stock cloudy.
Step 6 - Place onto the stovetop and bring to a simmer

Bring your stock up to temperature (just before a boil), and keep at a simmer. This will allow the flavours to develop, and will keep the stock nice a clear. Do not ever boil a stock, as this will cloud your stock.
Step 7 - Skim the top of the stock

As the stock is simmering on the stove, have a ladle and boil close by. Skim the impurities that come to the top of the stock (greyish brownish bubbles). As well as removing impurities, this will also help to insure a clear stock.
Step 8 - Let simmer on the stove top for time recommended below
Chicken; 4 hours
Beef; 8 hours
Fish; 45 minutes
Vegetable; 45 minutes
Step 9 - Take off the heat and let sit for 30 minutes or so

This step is important more so in beef stock, where you want the fat to settle at the top of the pot, so that you can ladle it out before straining. Some people leave this fat on, as it can usually be taken off in the form of a fat cap after it has been in the fridge for 24 hours. Also if you don't plan on getting to the stock in the fridge right away, the fat cap also acts to preserve the stock.
Step 10 - Strain your stock

Take your stock off the heat, and strain through a conical strainer, or any fine strainer you may have. It is a good idea to pass it through something not quite as fine the first time around, as the bones my puncture a fine strainer, and also make it hard to get all of the liquid through around everything else in the pot that is wanting to come out with the liquid.
Step 11 - Transfer to an ice bath or the fridge

After you have strained your stock into a container, you are going to want to cool down that container as quickly as possible. Usually filling up your sink with some ice and cold water does a good job, just make sure the liquid is heavy enough in the container that it doesn't topple over. Once the stock has been cooled down, you may now put it into the fridge, and not have to worry about it raising the internal temperature of your fridge.
Step 12 - Take out of fridge and skim off the fat

After the stock has sat overnight, it will usually have what is called a "fat cap" unto of it, where all of the fat in the stock has come to the top in the form of a cap. This makes it easy to remove, and leaves you with a pure, clean and clear stock.
Step 13 - Portion and freeze
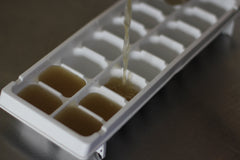

You may now place your stock back into the fridge to use as you wish, or what is most convenient is portioning out and freezing. The best way I find for the home cook, is to pour your stock into ice cube trays and freeze, then transfer into a large ziplock bag. This allows you to always have homemade stock on hand, and you only need to pull out as many cubes as a recipe calls for.
Recipe
Chicken bones - 2 full chicken carcass
Onions - 3 large
Carrots - 3
Celery - 3 stalks
Garlic - 8 cloves
Parsley - 5 large sprigs
Thyme - 5 sprigs
Bay leaves - 6
Black peppercorns - 12
Cold water - enough to fully cover
https://companymovers9.wordpress.com/
https://newmoverdotblog.wordpress.com/
https://qwasdew.wordpress.com/
https://wordpress.com/home/gigisaad.wordpress.com
Leave a comment